

Understanding the Small Business Health Insurance Tax Credit: A Practical Guide
Ever stared at the bottom line and thought, “There’s gotta be a way to keep my team healthy without draining my cash?” You’re not alone—small business owners wrestle with that exact dilemma every tax season.
What most people don’t realize is that the government actually hands out a little financial cushion called the small business health insurance tax credit. It’s not a myth; it’s a real dollar‑saving tool that can shave up to 50 % off the cost of qualifying group health plans for businesses with fewer than 25 full‑time employees.
In our experience at Life Care Benefit Services, we’ve seen owners who thought they were stuck paying full price suddenly unlock a credit that feels like a surprise bonus. Imagine being able to offer your staff doctor visits, prescriptions, and preventive care, and still have money left over for a new espresso machine or a marketing push.
But how does it work? First, your business must provide a “qualified” health insurance plan—typically a group plan that meets the Affordable Care Act’s minimum essential coverage standards. Next, you need to prove you’re paying at least 50 % of the premium for each employee. If those boxes are checked, the IRS lets you claim a credit equal to 50 % of the premiums you paid, capped at $1,000 per employee (or $500 for part‑time staff).
Sounds simple, right? The catch is paperwork. The credit is claimed on Form 8941 when you file your return, and you’ll need to keep records of the premiums you paid and the employee hours worked. That’s why many owners lean on an experienced agency to navigate the forms and ensure nothing slips through the cracks.
So, where do you start? Take a quick inventory of your current health plan, verify it meets the “qualified” criteria, and pull together payroll records for the past year. Then, reach out to a trusted advisor who can walk you through the credit calculation and filing process.
By tapping into the small business health insurance tax credit, you’re not just cutting costs—you’re investing in a healthier, more motivated workforce while keeping your budget in check. Let’s dive deeper into the steps you need to claim it and avoid common pitfalls.
TL;DR
If you’re a small business owner handling payroll and health, the small business health insurance tax credit can slash half of your premium costs.
Confirm a qualified plan, pay at least 50 % of premium, file Form 8941, and you could claim up to $1,000 per full‑time employee, preserving cash for growth.
Step 1: Determine Eligibility for the Small Business Health Insurance Tax Credit
If you’ve just heard about the small business health insurance tax credit, your first thought is probably, “Do I even qualify?” Trust me, you’re not alone. A lot of owners stare at the eligibility rules and wonder if they’ve missed a hidden requirement.
The good news? The IRS keeps the baseline pretty simple: you need fewer than 25 full‑time equivalent employees. That means if you’ve got 24 staff members working 30 hours a week, you’re still in the game. Once you hit 25 or more, the credit disappears like a bad coffee on a Monday morning.
Next, the plan itself has to be a “qualified” group health plan. In plain English, it must meet the Affordable Care Act’s minimum essential coverage standards. If you’re already offering a plan that covers doctor visits, prescriptions, and preventive care, you’re probably good. If you’re unsure, pull up the plan summary and look for the phrase “minimum essential coverage.”
But the credit isn’t just about the plan—it’s about how much you’re putting into it. You must pay at least 50 % of the premium for each employee. In other words, if the monthly premium is $500 per employee, you need to cover $250 or more. Anything less and the IRS says, “Nice try, but no credit.”
Employee hours matter, too. The credit applies to employees who work at least 30 hours a week on average. Part‑time folks under that threshold only qualify for a half‑credit of $500 instead of the full $1,000. So, grab your payroll report and flag anyone who’s consistently clocking in under 30 hours.
Here’s a quick checklist you can run through right now:
- Business has fewer than 25 full‑time equivalents.
- Health plan meets ACA minimum essential coverage.
- You cover ≥ 50 % of each employee’s premium.
- Employees work ≥ 30 hours/week (or note part‑time status).
- All payroll and premium records are organized for the tax year.
Documentation is the silent hero of this process. Keep copies of the insurance contract, payment receipts, and a spreadsheet that matches each employee’s hours to the amount you paid. When it’s time to file Form 8941, the IRS will want to see that paper trail.
Tip: most payroll software lets you generate a “hours‑worked” report with just a few clicks. Export that, line it up with your premium statements, and you’ve got a ready‑made eligibility file.
If you want a deeper dive into the eligibility nuances, check out our guide on Understanding and Navigating Small Business Health Insurance Subsidy Eligibility. It walks you through the same criteria with real‑world examples and a printable worksheet.
Sometimes a quick video explains things faster than a paragraph. Below is a short walkthrough that shows how to pull the right numbers from your payroll system.
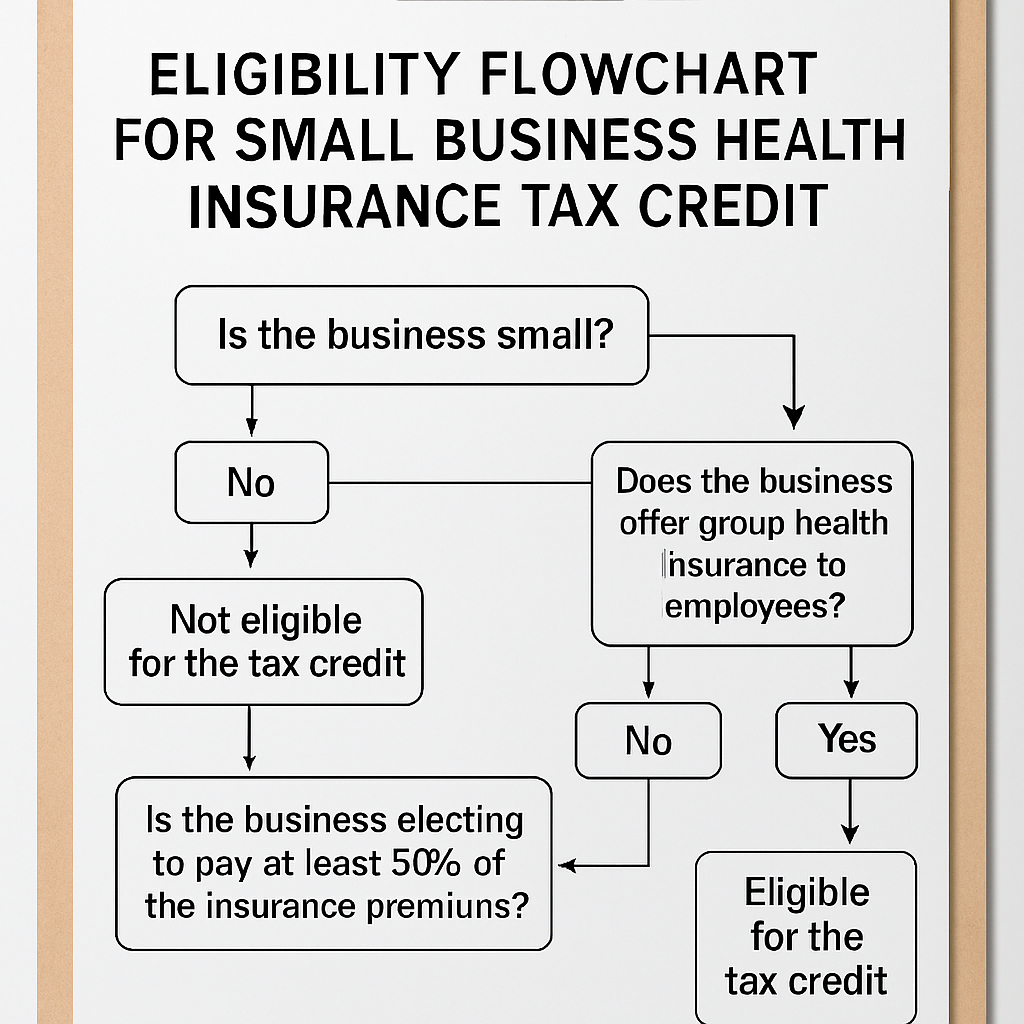
Visual learners can also picture the process. Imagine a flowchart where you start with “Count Employees,” move to “Verify Plan Coverage,” then “Calculate 50 % Premium Share,” and end at “File Form 8941.” That mental map makes the paperwork feel less intimidating.
Here’s a visual snapshot of that flow.
Now that you’ve ticked off the eligibility box, the next step is to crunch the numbers and see exactly how much credit you can claim. Grab your calculator, open the spreadsheet you just built, and let’s move on to the credit calculation.
Step 2: Calculate the Credit Amount Accurately
Alright, you’ve already proved you’re eligible – now it’s time to turn those numbers into a dollar‑saving credit. Think of it like baking: you’ve gathered the ingredients, now you follow the recipe so the cake actually rises.
Gather the premium data you actually paid
First, pull every invoice, bank statement, or payroll line that shows how much you, as the employer, covered for each employee’s health insurance. Ignore the employee’s share – the credit only cares about the amount you footed.
Tip: Open a simple spreadsheet with three columns – Employee name, Total monthly premium, and Your contribution. Fill it in for the 12‑month period you’re filing for.
Separate full‑time and part‑time staff
Full‑time employees (≥30 hours a week) can earn up to a $1,000 credit each. Part‑time folks (under 30 hours) cap at $500. Mark each row accordingly; it’ll save you a headache later.
Apply the wage‑scale multiplier
The IRS doesn’t give the full 50 % credit to everyone. If your average employee wage is $25,000 or less, you get the whole amount. Between $25,001 and $50,000, the credit shrinks linearly. For example, an average wage of $35,000 means you receive 70 % of the “raw” credit.
Here’s a quick formula you can drop into your spreadsheet:
- Raw credit per employee = 0.5 × (Employer‑paid premium)
- Apply cap ($1,000 or $500) to the raw credit.
- Multiply by wage‑scale factor (1.0 if ≤ $25k, otherwise 1 – [(AvgWage‑25k) ÷ 25k]).
- Sum the results for all employees.
Run a real‑world example
Imagine a boutique coffee shop with 6 full‑time baristas and 3 part‑time roasters. You pay $350 per month for each barista’s plan and $180 for each roaster.
Full‑time raw credit = 0.5 × $350 × 12 = $2,100. Cap it at $1,000 → $1,000 each.
Part‑time raw credit = 0.5 × $180 × 12 = $1,080. Cap at $500 → $500 each.
If the average wage across the shop is $22,000, the wage‑scale factor is 1.0, so the total credit is (6 × $1,000) + (3 × $500) = $7,500. That’s enough to cover a new espresso machine and a few weeks of marketing.
Now, what if the average wage bumps up to $38,000? The factor becomes 1 – [(38‑25) ÷ 25] = 0.48. Multiply each employee’s capped credit by 0.48 and you end up with roughly $3,600 – still a nice boost, just smaller.
Form 8941 walks you through the same math, line by line. When you copy your spreadsheet totals into the form, you’ll see the same numbers appear in the “Credit for small business health insurance” section.
Don’t forget to attach a copy of your premium statements and the spreadsheet you used – the IRS loves to see your work.
Still feeling fuzzy about the numbers? Watch the quick walkthrough below. It walks you through the spreadsheet set‑up and shows exactly where to plug the figures on Form 8941.
After the video, take a minute to verify each employee’s credit against the caps and the wage factor. If something feels off, it’s usually a missing premium payment or a mis‑categorized part‑time hour.
Final checklist before you file
- All employer‑paid premiums entered for the full year?
- Full‑time vs. part‑time status correctly flagged?
- Average wage calculated on the same employee set?
- Wage‑scale factor applied consistently?
- Spreadsheet totals match Form 8941 lines 1‑5?
Once everything lines up, you’re ready to file your return and claim the small business health insurance tax credit. In our experience, a clean worksheet not only speeds up the filing process but also gives you confidence that you’re squeezing every penny the credit allows.
If you’d like a second pair of eyes, give Life Care Benefit Services a call. We’ve helped dozens of owners double‑check their calculations and avoid costly mistakes.
Step 3: Gather Required Documentation and Proof of Coverage
Okay, you’ve crunched the numbers, and the credit looks good on paper. Now comes the part that trips most owners up: pulling together the paperwork the IRS actually wants to see.
Why the paperwork matters
Think of the documentation as the receipts you keep after a big purchase. Without them, the credit is just a nice idea, not a tax‑saving reality. The IRS will ask for proof that you paid the premiums and that the plan met “qualified” standards.
Start with the premium statements
First, locate every premium invoice or billing statement from the carrier you used last year. That includes monthly PDFs, electronic statements you downloaded from the insurer’s portal, or even the PDFs you printed when you set up the group plan. If you have more than one carrier, treat each set separately but keep them in the same folder.
Tip: When you open a statement, highlight the line that shows the employer’s contribution – that’s the amount that counts toward the credit. You can use a simple highlighter in Adobe or just a sticky note on a printed copy.
Payroll records that match the premiums
Next, pull the payroll runs where you recorded the employer‑paid portion of the health premium. Most payroll software lets you add a “benefit expense” line item. Export that column to a CSV and double‑check that the totals line up with the premium statements. If you notice a mismatch, chase the missing entry before you move on.
For small teams, a quick Excel pivot table that sums “Employer Contribution” by employee and month works wonders. In our experience, a clean spreadsheet saves you hours when the auditor asks for “the same numbers you reported on Form 8941.”
Proof of coverage – the plan document
You’ll also need a copy of the actual group health plan document that the insurer gave you. This is the policy booklet or the summary of benefits that shows the plan meets the Affordable Care Act’s minimum essential coverage. If you can’t find the original PDF, call the carrier’s support line and ask them to resend the “certificate of coverage.”
When you receive it, verify two things: the plan’s effective dates cover the entire tax year, and the plan’s description includes the words “group health” or “qualified health plan.” Those keywords are what the IRS looks for.
Employee‑level verification
Now, create a simple table that lists each employee, their full‑time or part‑time status, the total premium, and the amount you paid. Add a column for “hours worked” so you can show why someone qualifies as a full‑time employee (2,080 hours or more). This table is the backbone of the Form 8941 attachment.
Don’t forget seasonal workers. Even if they don’t count toward the FTE calculation, you still need to show you paid their premiums – that’s part of the “proof of coverage” requirement.
Putting everything together
Here’s a quick checklist you can print out:
- All premium statements for every carrier (PDF or printed).
- Payroll export showing employer‑paid premium amounts.
- Copy of the group health plan document with ACA compliance language.
- Employee table with status, hours, premium, and employer contribution.
- Any additional forms the state may require (for example, the Arizona health insurance premium tax credit application).
If you’re filing in Arizona, the state actually provides a short application you can attach to your federal return. You can download it from the Arizona Department of Revenue site — see the Arizona health insurance premium tax credit application for the exact form.
Final tip: keep a master folder
Create a digital folder named “2024 Health Credit Docs” and drop every file inside, naming each with a consistent pattern (e.g., “Premium_Employer_JohnDoe_2024.pdf”). When the time comes to attach documents to your tax return, you’ll be able to zip the whole folder and upload it in one go.
And remember, a tidy file set not only speeds up the IRS review, it also gives you peace of mind that you’re not leaving any dollar on the table.
Step 4: Apply for the Credit Through Your Tax Return
Okay, you’ve gathered every premium statement, payroll export, and plan document – now it’s time to actually claim the small business health insurance tax credit on your return. Sounds a bit intimidating, but think of it as filing a regular business tax form with a few extra lines that could put thousands back in your pocket.
1. Pull out Form 8941
Form 8941 is the IRS worksheet that captures the credit. You’ll find it on the IRS website under “Forms & Instructions.” The form has four parts: eligibility, credit calculation, carryover, and attachment summary. Most owners only need to complete Part I (Eligibility) and Part II (Credit Amount). The other parts are optional unless you’re rolling a credit forward or back.
2. Fill in the basics
Start with your business name, EIN, and the tax year you’re filing. Then answer the yes/no questions about having a qualified group health plan and paying at least 50 % of the premiums. If any answer is “no,” the credit won’t apply – double‑check your paperwork before you move on.
3. Plug in the numbers you’ve already crunched
Remember the spreadsheet you built in Step 2? Those totals go straight onto line 1 through line 5 of Form 8941. For each employee, you’ll enter the employer‑paid premium, apply the $1,000 (full‑time) or $500 (part‑time) cap, and then multiply by the wage‑scale factor. The form will sum everything for you, giving you the raw credit amount.
4. Apply the wage‑scale multiplier
If your average employee wage is under $25,000, you keep the full raw credit. If it falls between $25,001 and $50,000, calculate the reduction factor: 1 – [(AvgWage – 25,000) ÷ 25,000]. Plug that factor into line 6. The result is the final credit you can claim on your return.
5. Attach the supporting docs
The IRS wants proof – think of it like a receipt for a big purchase. Attach a PDF of your premium statements, the payroll export that shows the employer contribution, and the group health plan summary. If you’re filing in Arizona, slip in the state application form you downloaded earlier. All of these go in the “Supporting Documentation” section of your e‑file or, if you’re mailing a paper return, attach them behind the tax forms.
6. E‑file or mail?
Most small businesses find e‑filing the smoothest route. Your tax software will prompt you to upload the PDFs directly to the appropriate lines on Form 8941. If you prefer paper, print everything double‑sided, staple the Form 8941 packet, and mail it to the address listed in the Form 8941 instructions. Keep a copy for your records.
7. Double‑check the deadline
The credit must be claimed on the tax return for the year you paid the premiums – typically by April 15 of the following year. If you need extra time, file for an extension (Form 4868) before the deadline; the credit itself still has to be reported on the original return, not the extension.
8. What if the credit exceeds your tax liability?
Good news – the credit is refundable up to $500 per employee if your tax liability is lower than the credit amount. That means the excess will show up as a refund on your 1040 NR or 1120‑S. Just make sure you’ve filled out the refundable portion on line 7 of Form 8941.
Quick checklist before you hit “Submit”
| Task | Form/Tool | Key Tip |
|---|---|---|
| Confirm eligibility | Form 8941 Part I | Check “qualified plan” and 50 % employer contribution. |
| Enter premium totals | Form 8941 lines 1‑5 | Use your spreadsheet; caps are $1,000/$500. |
| Attach proof | PDF uploads or paper attachments | Label each file clearly (e.g., “Premium_JaneDoe_2024.pdf”). |
Once everything lines up, hit submit and let the IRS do the rest. In our experience, a clean, well‑documented Form 8941 reduces the chance of an audit and speeds up any refund you’re owed. If you hit a snag, a quick call to your accountant or a trusted advisor can save you hours of head‑scratching.
And that’s it – you’ve turned a pile of paperwork into a real dollar credit that can fund new equipment, a marketing push, or simply boost your bottom line. Ready to claim yours?
Step 5: Leverage Group Health Plans to Maximize Savings
Now that you’ve nailed the paperwork and crunched the numbers, it’s time to think bigger: how can the very plan you’re already paying for do even more for your bottom line?
Think of your group health plan as a toolbox. Besides covering doctor visits, it can also be the key to unlocking extra tax savings, lower premium rates, and even better employee retention. Let’s walk through the practical ways you can squeeze every possible dollar out of that plan.
Review the “Qualified” Definition Again
Even though you’ve already confirmed eligibility, a quick second‑look never hurts. The IRS looks for two things: minimum essential coverage and that the plan is offered on the SHOP Marketplace or a comparable group market. If you’re not there yet, consider switching carriers or adding a “self‑insured” component that still meets the ACA standards. In our experience, a small tweak—like adding a dental rider—can keep the plan qualified while giving employees a perk they actually use.
Bundle Benefits to Reduce Premiums
Most carriers offer discounts when you bundle health, dental, and vision into a single contract. Those bundled rates often shave 5‑10 % off the total premium. That reduction directly lowers the amount you need to cover, which means a bigger credit on Form 8941. Ask your broker to run a side‑by‑side comparison; sometimes the cheapest “stand‑alone” health plan ends up costing more once you factor in lost bundling discounts.
Leverage the “Employer Contribution” Threshold
Remember the 50 % rule? If you can push your contribution just a notch higher—say 55 % instead of 50 %—you still qualify for the credit, but you also increase the raw credit amount because the employer‑paid premium is larger. That extra few dollars per employee adds up fast, especially in a team of 20. A simple spreadsheet can show you the sweet spot where the incremental contribution is outweighed by the larger tax credit.
Offer a Health Reimbursement Arrangement (HRA)
An HRA sits alongside a traditional group plan and lets you reimburse employees tax‑free for qualified medical expenses. Because the reimbursements are treated as employer contributions, they count toward the 50 % premium threshold. Plus, HRAs are flexible—you can set annual caps that align with your cash flow, and any unused funds roll over. This dual‑track approach often results in a higher overall credit while giving staff more control over their healthcare dollars.
Use Tiered Plans to Match Employee Needs
Not every employee needs the same level of coverage. By offering a tiered menu—basic, standard, premium—you let people opt‑in to higher‑cost plans only if they truly want them. The employer contribution on the lower tiers stays modest, keeping the average premium down, while those who choose premium still generate a credit based on the amount you actually pay. It’s a win‑win: you keep costs predictable, and employees feel they have choice.
Track Hours and Adjust FTE Counts Annually
Because the credit caps at $1,000 per full‑time employee, it pays to keep an accurate eye on who qualifies as full‑time versus part‑time. If a seasonal worker moves from 20 hours a week to 30 hours, that shift instantly bumps them into the $1,000 cap category. A quarterly review of timesheets ensures you’re not missing out on extra credit simply because you left an employee’s status stale.
Document Every Change Meticulously
Every time you add a rider, switch carriers, or tweak the employer contribution, write a brief memo and attach it to your master “2024 Health Credit Docs” folder. When the IRS asks for proof—something they love to do—having a dated note next to the corresponding premium statement saves you from scrambling. It also makes the audit trail crystal clear for your accountant.
So, what’s the next concrete step? Grab your current plan summary, pull up your payroll data, and run a what‑if scenario: increase the employer contribution by 5 % and see how the credit changes. If the numbers look good, call your carrier or broker and ask about bundling options or adding an HRA. In most cases, you’ll see a tangible boost to your credit without any extra out‑of‑pocket cost.

When you’re done, you’ll have turned a routine employee benefit into a strategic financial lever—more savings, happier staff, and a stronger cash flow for growth.
Step 6: Avoid Common Mistakes and Stay Compliant
Alright, you’ve crunched the numbers and you’re ready to claim that sweet small business health insurance tax credit – but one tiny slip can turn a refund into a headache.
So, what should you watch out for? Think of it like double‑checking the espresso machine before the morning rush: a quick glance now saves a lot of panic later.
1. Don’t Let Documentation Slip
The IRS loves receipts. Every invoice, bank statement, or PDF that shows how much you paid for employee coverage needs to be filed away. In our experience, a missing line item is the most common audit trigger.
Action step: create a folder called “2024 Health Credit Docs” on your cloud drive. As soon as you receive a premium statement, rename it “Premium_Employer_[EmployeeName]_2024.pdf” and drop it in. Consistency makes the audit trail crystal clear.
2. Verify the “Qualified” Status of Your Plan
If your plan isn’t an ACA‑minimum‑essential‑coverage group plan, the credit disappears. That’s why it pays to pull the plan’s certificate of coverage and scan for the words “qualified” or “minimum essential.”
Tip: the IRS’s own guidance in Publication 334 spells out the qualified‑plan criteria. A quick skim can save you from filing a credit that the IRS will later reject.
3. Track Full‑Time vs. Part‑Time Hours Every Quarter
Remember, the credit caps at $1,000 per full‑time employee and $500 per part‑time employee. If you let an employee’s hours drift from 28 to 32 without updating your records, you’ll miss out on the higher cap.
Do this: at the end of each quarter, run a payroll export that sums hours per staff member. Flag anyone crossing the 2,080‑hour threshold and adjust your eligibility table immediately.
4. Don’t Under‑pay the Employer Contribution
The 50 % rule is strict. If you cover $295 of a $600 premium, you’re below the threshold and that employee’s credit evaporates.
Simple fix: run a “what‑if” scenario in your spreadsheet. Increase the employer contribution by 5 % and watch the credit line jump. Often the extra cash outlay is less than the additional credit you’ll receive.
5. File the Right Forms, on Time, and Attach Everything
Form 8941 is where the magic happens, but the IRS also expects a copy of the plan document, premium statements, and the employee‑level spreadsheet. Missing any of these is like sending a postcard without a stamp.
Before you hit “Submit,” run this checklist:
- Form 8941 completed (Lines 1‑5 filled with capped amounts).
- Employer‑paid premium statements attached.
- Group health plan summary with ACA language.
- Employee table showing hours, status, and contributions.
- Any state‑specific credit forms (e.g., Arizona application).
6. Stay Ahead of Audit Red Flags
The IRS will randomly request proof. If you’ve dated every memo, labeled every file, and kept a running change log, you’ll be able to hand over a tidy zip file in minutes.
Pro tip: add a one‑line note each time you tweak the contribution rate or add a rider. Something like “2024‑07‑15: increased employer contribution to 55 % for new HRA.” It looks tiny, but it’s gold when the auditor asks “When did this change occur?”
7. Use Year‑End Tax‑Planning Strategies
Even if you’ve maximized the credit this year, you can still position yourself for next year’s filing. Consider bundling dental and vision, adding an HRA, or shifting seasonal workers’ hours so they count as part‑time rather than full‑time.
For broader tax‑planning ideas, the tax‑planning best practices guide offers a quick read on timing income and accelerating deductions – tactics that dovetail nicely with the health‑insurance credit.
Quick Action Summary
1. Archive every premium document the moment it lands in your inbox.
2. Confirm the plan’s qualified status using IRS guidance.
3. Quarterly, reconcile hours vs. FTE thresholds.
4. Run a contribution‑increase “what‑if” in your spreadsheet.
5. Complete Form 8941, attach all supporting files, and double‑check the deadline (April 15 for calendar‑year filers).
6. Keep a dated change log for any plan adjustments.
7. Review next year’s strategy now – bundle benefits, tweak contributions, and align seasonal staffing.
If you follow these steps, you’ll keep the credit flowing, avoid nasty surprises, and maybe even free up cash for that espresso machine you’ve been eyeing.
Conclusion
Looking back, you’ve gone from wondering whether the small business health insurance tax credit even existed to having a clear roadmap for capturing every dollar. Does it feel like a lot, but now it’s all laid out in bite‑size steps?
We’ve covered the basics: confirming your plan is qualified, tallying employer‑paid premiums, applying the wage‑scale multiplier, and attaching the right paperwork to Form 8941. Then we showed how to boost the credit with contribution tweaks, bundled benefits, and an HRA.
The common thread? Discipline. Keeping premium statements, payroll exports, and change‑log notes in one folder saves you headaches when the IRS asks for proof. A quarterly review of hours and contributions can turn a missed $1,000 per full‑time employee into real cash for your business.
So, what’s the next move? Pull your 2024 premium spreadsheet, add a column for a 5 % contribution increase, and see how the credit climbs. If the numbers look good, update your employer contribution and file the revised Form 8941 before the April 15 deadline.
In our experience, small tweaks often unlock enough credit to fund that new espresso machine, a marketing push, or simply boost your bottom line.
Ready to lock in the credit and keep more money in the bank? Give Life Care Benefit Services a quick call or schedule a consultation – we’ll walk you through the final checklist and make sure nothing slips through the cracks.
FAQ
What is the small business health insurance tax credit and who can claim it?
In a nutshell, the credit rewards small employers who provide a qualified group health plan and foot at least half of each employee’s premium. If you have 25 or fewer full‑time equivalent (FTE) employees and your average wage is under $50,000, you’re in the sweet spot. It’s designed to make offering health coverage less painful for owners who are juggling payroll, marketing, and maybe a handful of coffee runs.
How do I calculate the credit for my employees?
Start with the total amount you actually paid for each employee’s insurance over the year. Multiply that by 50 % – that’s the raw credit. Then apply the $1,000 cap for full‑time staff or $500 for part‑time. Finally, adjust for the wage‑scale factor: if your average wage is $25k or less you keep the full amount; above that, the credit shrinks linearly until it disappears at $50k. Plug those numbers into Form 8941 and you’ll see the exact dollar figure.
What documentation do I need to keep for the IRS?
You’ll want a tidy folder – think “2024 Health Credit Docs” – that holds every premium invoice, the payroll export showing the employer‑paid line, and a copy of the group plan’s certificate of coverage. Add a one‑page spreadsheet that lists each employee, hours worked, full‑time or part‑time status, total premium, and your contribution. When the IRS asks for proof, a well‑labeled PDF zip file will save you hours of scrambling.
Can I claim the credit if I use a Health Reimbursement Arrangement (HRA)?
Yes, an HRA can count toward the 50 % contribution threshold because the reimbursements are treated as employer‑paid premiums. Just make sure the HRA is offered alongside a qualified group health plan and that the reimbursements are documented in the same spreadsheet you use for the credit. In practice, many of our clients see a modest bump in the credit by layering an HRA on top of their base plan.
What happens if my credit exceeds my tax liability?
The good news is the credit is partially refundable – up to $500 per employee can be refunded even if you owe less tax than the credit amount. The excess shows up as a refund on your return, so you don’t leave money on the table. Just be sure to fill out the refundable portion on line 7 of Form 8941; otherwise the IRS will treat the excess as unused.
How often should I review my contributions to maximize the credit?
Quarterly is a sweet spot. Pull a quick payroll export each quarter, recalculate the average wage, and see whether a tiny bump in your employer contribution (say 5 %) would push the raw credit higher than the extra cash you spend. Because the credit caps at $1,000 per full‑time employee, even a modest increase can pay for itself many times over.
Are there state‑specific versions of the credit I should know about?
Some states, like Arizona, run their own premium‑tax credit programs that mirror the federal rules but require a separate state form. If you’re filing in a state with its own version, you’ll need to attach the state application alongside Form 8941. Check your state’s revenue department website for the latest form – it’s usually a one‑page PDF you can download and zip with your other documents.